Как установить grub uefi
Установка загрузчика Grub
Для инициализации ядра и запуска операционной системы Linux используется загрузчик. Это программа, которая запускается после завершения проверки оборудования BIOS, подготавливает оборудование к работе, задает нужные параметры ядра и позволяет выбрать операционную систему. Основная задача загрузчика дать пользователю выбрать операционную систему для загрузки.
Раньше для загрузки Linux использовалось несколько загрузчиков, это isolinux, lilo, grub. Но сейчас чаще всего применяется Grub или полное его название GRand Unified Bootloader. В этой статье будет рассмотрена установка загрузчика Grub через терминал. Также мы поговорим как установить grub на компьютер с UEFI, тоже вручную.
Немного теории
В MBR вариантов немного, Grub записывается в область MBR на диске. Размер сектора MBR занимает первых 512 байт и этого вполне достаточно для того, чтобы установить туда загрузчик.
GPT предоставляет более широкие возможности. Во-первых, для совместимости в GPT эмулируется сектор MBR, и мы можем установить GRUB туда, но такой вариант очень ненадежный и не рекомендуемый. Во-вторых, теперь появилась возможность устанавливать Grub на раздел диска. Мы просто создаем раздел на диске размером 1 Мб и записываем туда то, что раньше записывалось в MBR, это делает установку загрузчика более надежной и защищенной от сбоев.
Для установки Grub будет использоваться команда grub-install, во всех случаях. Давайте кратко рассмотрим ее синтаксис и параметры. Синтаксис:
$ grub-install опции диск
Параметров здесь достаточно много, но нам будут нужны только некоторые:
Основу разобрали. Теперь перейдем к установке. Дальше я буду предполагать, что все действия выполняются из системы, для которой нужно установить загрузчик или из chroot окружения этой системы.
Установка загрузчика Grub в MBR для BIOS
Начнем с самого просто и привычного. Данная инструкция как установить загрузчик Grub подойдет для любого дистрибутива, поскольку команды везде почти одинаковые. Здесь не нужно устанавливать никаких дополнительных пакетов или создавать разделов. Установка Grub на жесткий диск выполняется командой:
sudo grub-install /dev/sda
sudo grub2-install /dev/sda
Готово. По поводу двойки здесь такое же замечание. Если вы хотите установить Grub на флешку в MBR, то тут тоже нет проблем просто примонтируйте флешку и выполните такую команду:
Установка загрузчика Grub в GPT для BIOS
Во-первых, мы можем ничего не менять и установить Grub так, как описано в предыдущем способе. Но тогда он будет установлен в область совместимости с MBR, а это не надежно. Поэтому рекомендуется установить grub так, как описано ниже, на отдельный раздел.
Нужный нам раздел можно создать в установщике любого дистрибутива, если вы выполняете установку в графическом интерфейсе или с помощью gparted. Нам нужен раздел размером 1 Мегабайт без файловой системы и с меткой grub_bios:
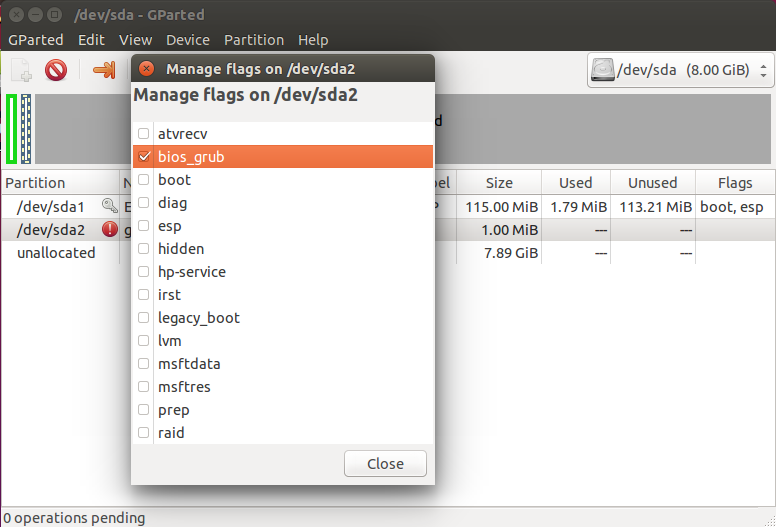
Дальше примените изменения, нажмите на разделе правой кнопкой, выберите manage flags и добавьте флаг grub_bios:
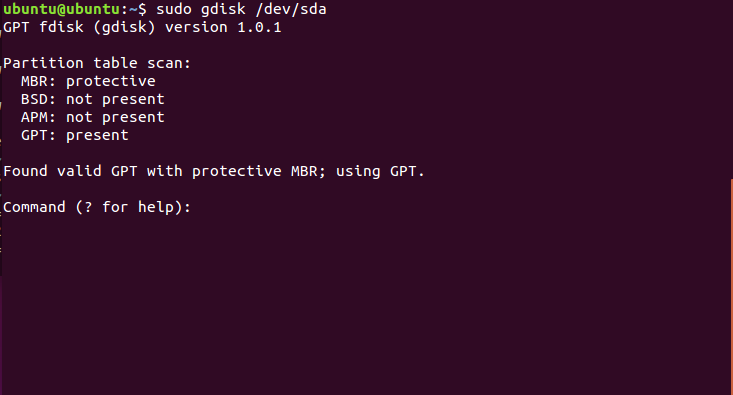
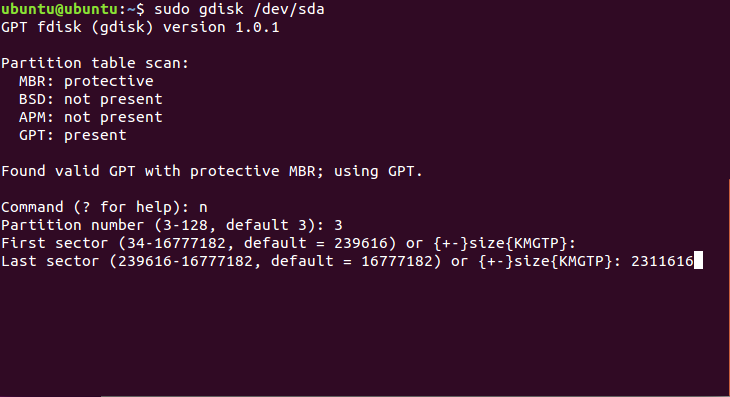
Готово. Если у вас нет под рукой доступа к графическому интерфейсу, вы можете создать такой раздел через терминал. Утилита fdisk не поддерживает работу с gpt, поэтому будем использовать gfdisk. Сначала запустите утилиту:
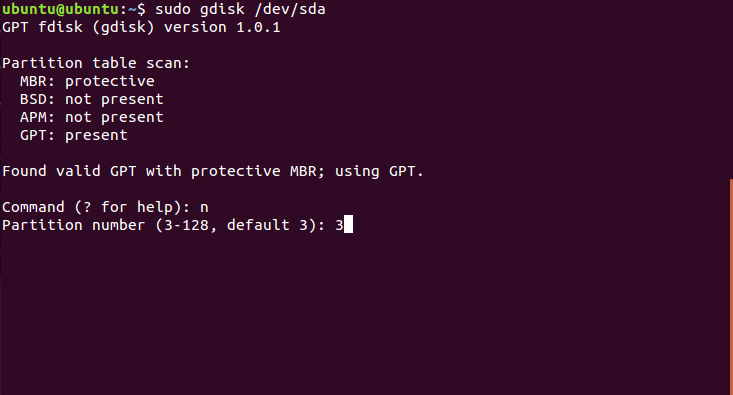
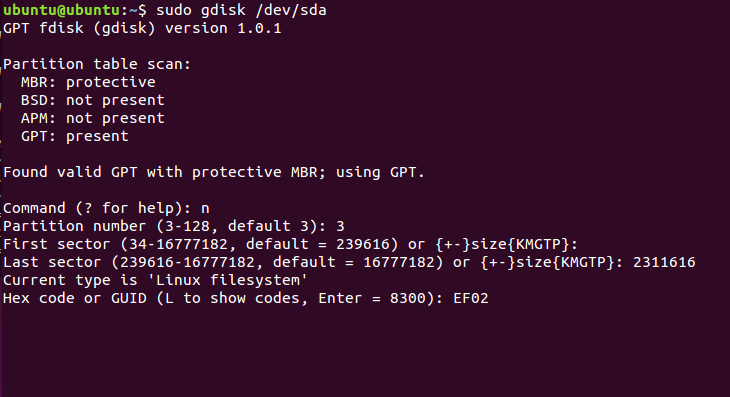
Чтобы создать новый раздел нажмите n и выберите номер раздела:
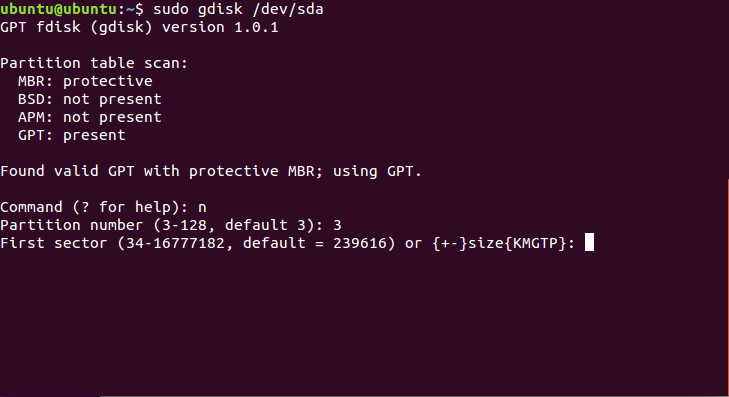
Соглашаемся с начальным сектором, будет использован первый же свободный:
Готово, осталось нажать w для записи изменений на диск:
Установка grub на жесткий диск дальше выполняется точно так же, как и в предыдущем способе:
sudo grub-install /dev/sda
Осталось создать конфигурационный файл grub:
Теперь переходим к самому сложному, как установить grub efi.
Установка GRUB UEFI GPT
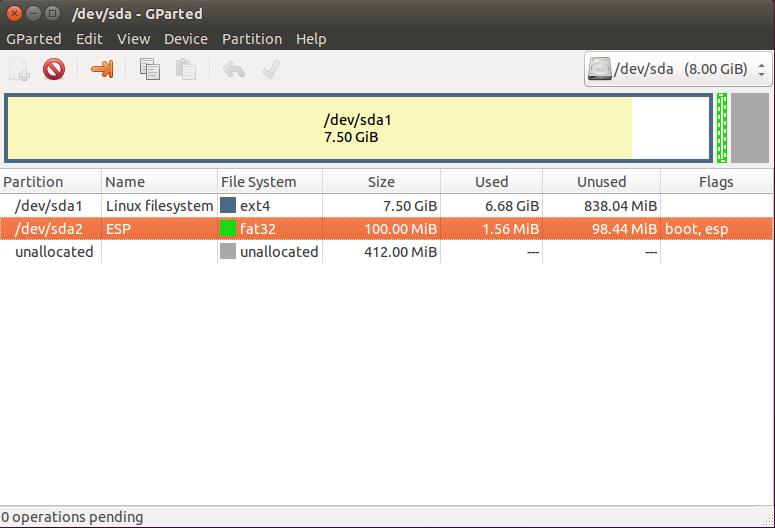
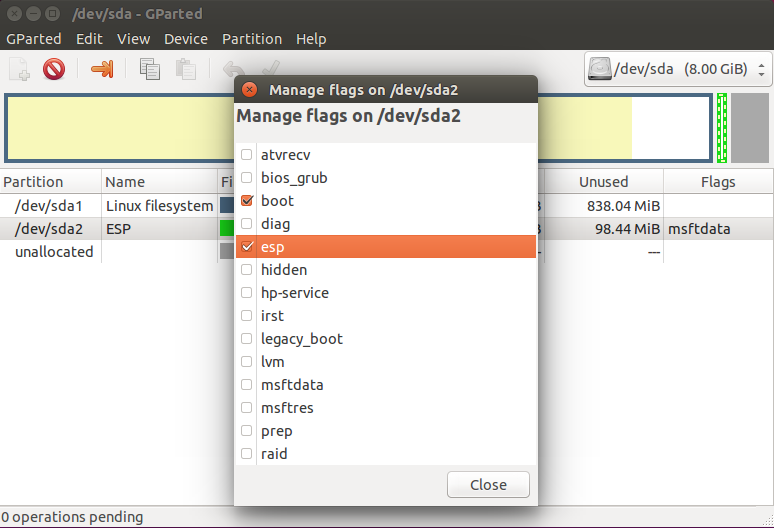
Установка Grub UEFI чем-то похожа на установку в GPT, тут у нас тоже будет отдельный раздел, только на этот раз не для загрузчика, а раздел EFI. Если у вас уже установлена Windows, то, скорее всего, он уже существует. Этот раздел обычно занимает 100 Мб, имеет файловую систему fat32 и флаг ESP. Вот так он будет выглядеть:
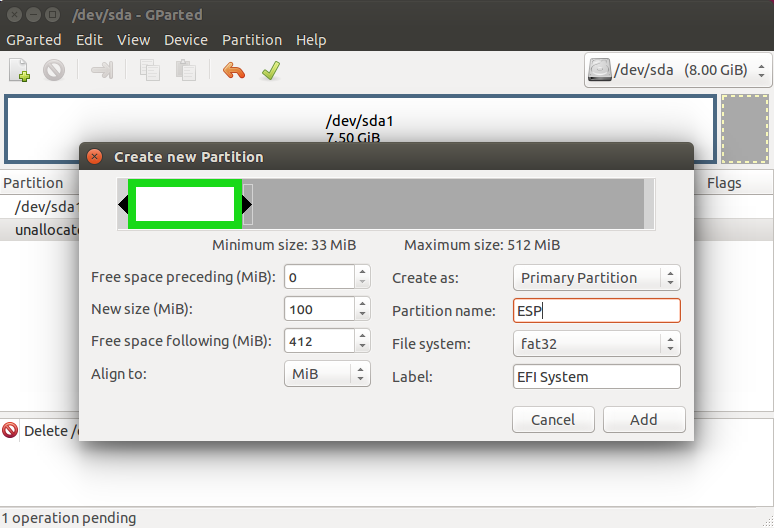
Если же такого раздела нет, мы можем его создать с помощью gparted. Для этого создаем раздел с такими параметрами:
Размер 100 Мегабайт, имя раздела ESP, файловая система fat32. Дальше примените изменения и установите для раздела флаг ESP:
То же самое вы можете сделать в Gdisk, только на этот раз нужно устанавливать HEX Code раздела ef00. После того как раздел был создан, подключаем его к нашей файловой системе:
sudo mkdir /boot/efi
$ sudo mount /dev/sda2 /boot/efi
sudo apt install grub-efi efibootmgr
Дальше останется только установка grub efi. Система сама определит нужный раздел и скопирует туда все файлы:
Установка Grub efi на MBR все выглядит точно так же, только тут есть несколько ограничений. Раздел ESP нужно создавать только в начале диска. В режиме EFI тоже можно установить GRUB на флешку, и это не очень сложно. Для этого используется команда:
Выводы
Теперь установка Grub не вызовет у вас проблем. Мы разобрали не только как установить Grub2 в MBR но и в EFI. Кроме того, всю приведенную здесь информацию вы можете использовать для восстановления Grub. Так вы будете лучше понимать что происходит во время восстановления. А настройку параметров и ручное создание конфигурационного файла мы рассмотрим в одной из следующих статей.
Ubuntu Documentation
This page details the procedures for installing and reinstalling GRUB 2. The information applies to most versions of GRUB 2, but is specifically written for version 1.99. GRUB 1.99 is included on Ubuntu releases 11.04 (Natty Narwhal) and later. For more information on a variety of GRUB 2 topics, please visit the GRUB2 main page. For information on converting to or from GRUB Legacy, please view the Grub2/Upgrading community doc.
The GRUB 2 bootloader is included on all currently-supported versions of the Ubuntu family. GRUB 2 can accomodate traditional computer firmware such as BIOS as well as the newer EFI/UEFI standards. It is compatible with MBR, GPT and other partitioning tables.
All references to GRUB pertain to GRUB 2. Where GRUB 0.97 is discussed, it will be referred to by version number or as GRUB Legacy.
GRUB 2 Initial Installation
GRUB 2 installation is automatically incorporated into a normal Ubuntu installation. Input required by the user for the initial setup is very simple. If the installation will use the entire disk no specific GRUB selections are necessary. If the user wants to use a specific partition for Ubuntu the user must select the Ubuntu partition and the drive on which to embed the bootloader information.
The main GRUB 2 folder locations include /boot/grub/ and /etc/grub.d/. User preferences are stored in the /etc/default/grub file. The GRUB 2 menu is built by information contained in /boot/grub/grub.cfg.
Installation Options (LiveCD)
Using the Entire Drive ( «Erase disk and install Ubuntu» ):
Install on entire drive: The user should select a drive on which Ubuntu and GRUB 2 will be installed. GRUB 2 will overwrite the drive’s boot information and place the GRUB 2 files in the appropriate locations.
Installing Ubuntu to a Specific Partition («Something Else»):
When using the «Something Else» option, you will be offered to choose the «Device for bootloader installation». Please select: * either the disk (eg /dev/sdX, not /dev/sdXY) on which the BIOS is setup to boot (recommended for normal use) * OR the partition (eg /dev/sdXY, not /dev/sdX) on which Ubuntu (/boot, else /) will be installed (only if you want to chainload it from another bootloader; if any doubt, do NOT choose this)

BIOS/MBR Notes
GRUB 2 normally writes its bootloader information to an area just beyond the Master Boot Record and before the first partition. Some software on non-Linux operating systems also used this embedded area and broke the system by overwriting the GRUB 2 information on dual-boot systems. GRUB 2 now can recognize this potential problem and avoid it.
The bootloader information does not have to be installed to the embedded area of the MBR. It may also bypass the MBR entirely and be installed to a specific partition. In doing this, the location of the GRUB 2 files are specified by using blocklists. This option is not available via an Ubuntu GUI installation but can be made via the terminal after installation. Even then this method is not as reliable as writing to the MBR and is not recommended by the GRUB developers.
BIOS/GPT Notes
If the BIOS is setup to boot the disk in Legacy/mbr mode, installing GRUB2 on a GPT (GUID Partition Table) disk requires a dedicated BIOS boot partition with a recommended size of at least 1 MiB. This partition can be created via GParted or other partitioning tools, or via the command line. It must be identified with a bios_grub flag. The necessary GPT modules are automatically included during installation when GRUB 2 detects a GPT scheme.
GRUB 2 is compatible with EFI/UEFI and will load the necessary modules during installation. For information on this topic, please visit the UEFI community documentation.
Post-Installation
To view the GRUB 2 file system and configuration options please refer to Grub 2 community documentation page.
Reinstalling GRUB 2
Reinstalling GRUB 2 from a Working System
If Ubuntu is operating normally, boot into the working installation and run the following command from a terminal.
X is the drive (letter) on which you want GRUB to write the boot information. Normally users should not include a partition number, which would produce an error message as the command would attempt to write the information to a partition.
This will rewrite the MBR information to point to the current installation and rewrite some GRUB 2 files (which are already working). Since it isn’t done during execution of the previous command, running sudo update-grub after the install will ensure GRUB 2’s menu is up-to-date.
Fixing a Broken System
If a system has become unbootable due to a GRUB 2 failure or corrupted MBR/boot sector, there are various methods for reinstalling GRUB 2. The simplest is listed first, followed by more complicated methods.
via Boot-Repair Graphical Tool
Boot-Repair is a GUI application which can fix a variety of GRUB 2 problems. It can be used either from a LiveCD, its own CD, or during a normal Ubuntu session. In addition to providing a simple user interface, Boot-Repair also includes the ability to run a script to gather details of the system which can be used for troubleshooting help on various forums and IRC channels.
Please refer to the Boot-Repair community documentation for instructions on how to install and run this application.
via GRUB2 Rescue mode
GRUB 2 provides a rescue mode which allows the user to attempt to repair GRUB 2 from a special GRUB terminal during boot. Refer to the Grub2 Command_Line_and_Rescue_Mode section for information on GRUB terminal operations.
via the LiveCD terminal
This method uses the terminal from a LiveCD. The user must know the device name/partition of the installed system (sda1, sdb5, etc), which is then mounted from the LiveCD. GRUB 2 files are copied from the LiveCD libraries to the proper locations and MBR.
This operation will write to the MBR and restore the modules and core.img to /boot/grub. It will not replace or restore grub.cfg or fix corrupted files. Boot the LiveCD, select «Try It», and open a terminal.

If necessary, use the fdisk command to help determine the partition on which Ubuntu is installed. The fdisk option «-l» is a lowercase «L». Look for one of the appropriate size or formatting. Running sudo blkid may provide more information to help locate the proper partition, especially if the partitions are labeled. The ‘
In the following commands:
Use the partition number of the Ubuntu installation with mount command.
Do not use the partition number with the grub-install command.
X is the drive letter (a, b, c, etc.); Y is the partition number (1, 5, etc).
—boot-directory is the folder in which the GRUB folder is located. This is normally /boot but should be changed if the grub folder is located elsewhere.
On systems with a separate /boot partition, that partition should be mounted to /mnt/boot. For instance: sudo mount /dev/sda6 /mnt/boot
grub-install will restore missing files in the grub folder but will not restore intentionally deleted or corrupted files. To accomplish these tasks GRUB 2 must be completely removed and reinstalled.
If Ubuntu is installed on B-tree file system i.e. btrfs then /boot changes to /@/boot in above commands such that :
For GRUB 2 version 1.98 and earlier (Ubuntu 10.04), the installation command is slightly different. Rather than designating the —boot-directory, the switch is —root-directory. In this case, the location changes to /mnt
If the user wishes to explore why the system failed, refer to Post-Restoration Commands section below.
via Partition Files Copy
This method does not work if GRUB has not already been installed, or if GRUB files have been deleted.

From the Places menu, select and click the partition containing your Ubuntu installation to mount it.
Once mounted, the user should see Ubuntu system directories such as /boot
Open a terminal by selecting Applications, Accessories, Terminal from the menu bar.
When ready to copy the UUID/location, by highlighting it with the mouse. Paste it into the terminal by pressing the middle mouse button. If using the keyboard, use CTRL-SHIFT-arrow to select and CTRL-C to copy the location and CTRL-SHIFT-V to paste it into the terminal.
The device/drive is designated by sdX, with X being the device designation. sda is the first device, sdb is the second, etc. For most users the MBR should be installed to sda, the first drive on their system. Example:
If the user gets a «error: Cannot open /boot/grub/device.map» message, add the -m switch and path to the device.map to the command as follows: Example:
Refresh the GRUB 2 menu with sudo update-grub
If the user wishes to explore why the system failed, refer to Post-Restoration Commands section below.

via ChRoot
Assuming the normal system partition(s) are on a software RAID (otherwise skip this step): make sure the mdadm tools are installed in the Live CD environment (e.g. by executing sudo apt-get install mdadm). Then assemble the arrays:
Determine your normal system partition. The following commands may be helpful. The fdisk switch is a lowercase «L».
Example 1: sudo mount /dev/sda1 /mnt
Example 2: sudo mount /dev/md1 /mnt
Only if you have a separate boot partition (where sdXY is the /boot partition designation):
Example 1: sudo mount /dev/sdb6 /mnt/boot
Example 2: sudo mount /dev/md0 /mnt/boot
Reinstall GRUB 2 (substitute the correct device with sda, sdb, etc. Do not specify a partition number):
If the system partitions are on a software RAID install GRUB 2 on all disks in the RAID. Example (software RAID using /dev/sda and /dev/sdb):
Recreate the GRUB 2 menu file (grub.cfg)
Boot repair after a Windows Upgrade on Ubuntu 14.04 (non-RAID)
sudo mount /dev/sdXY /mnt [where sdXY has previously been identified using gparted]
sudo grub-install /dev/sdX [note this is sdX not sdXY!]
Purging & Reinstalling GRUB 2
The difference between using the grub-install command and purging & reinstalling GRUB 2 is that the latter completely removes all GRUB 2 files and system settings. Purging GRUB 2 is also a method to reset all configuration settings to the default values on a working system. This may correct GRUB 2 failures due to corrupted files and improper configurations as well as for missing folders/files deleted by the user. The GRUB 2 packages removed and reinstalled via this procedure include grub-pc, grub-common and, in Grub 1.99 and later, grub-gfxpayload-lists.

This procedure can be accomplished very simply via Boot-Repair, or via the terminal procedure below.
Remark: the Boot-Repair procedure will also remove custom files that may block the boot. It is also able to purge and reinstall GRUB2 for UEFI / LVM / RAID systems.
via Boot-Repair Graphical Tool
via Terminal Commands
The commands from a working Ubuntu installation or once within the ChRoot of a LiveCD are the same.
If using the LiveCD, complete the steps up to and including the sudo chroot command (Step 9) in the previous section.
The following command will completely remove grub-pc and grub-common. In GRUB 1.99 and later, grub-gfxpayload-lists will also be removed.
If using the ChRoot procedure, Exit chroot then continue the ChRoot procedure at Step 13:
Post-Restoration Commands
Once the user can boot to a working system, the following commands may prove useful in locating and/or fixing the problem.
To refresh the available devices and settings in /boot/grub/grub.cfg
sudo update-grub
To look for the bootloader location.
To install GRUB 2 to the sdX drive’s MBR or boot sector (sda, sdb, etc.)
sudo grub-install /dev/sdX
Moving GRUB 2
The command to change the GRUB 2 installation device or boot files is grub-install run as root. This command allows the user to modify the installation by setting the ROOT directory, preload modules, run specific setup files and more. When executed, grub-install may run one or more other commands, such as grub-probe, grub-mkimage, and grub-setup. Here are some considerations when running grub-install:
If only the device is specified (sda, sdb, etc), the boot information will be written to the specified device’s boot record. (example: sudo grub-install /dev/sda )
If the —boot-directory= switch is used, the grub folder will will become a subfolder of the location specified. The —boot-directory switch is available in GRUB 1.99 and later.
If the user attempts to run the command with a specific partition (example: sudo grub-install /dev/sda6 ) a warning will be issued. Specifying a partition is not recommended due to the use of blocklists, which the developers consider unreliable. An option is provided on how to override this recommendation if the user still wishes to do so.
An alternative command to install or move GRUB 2 from a particular device is to use the dpkg-reconfigure command. As the command runs, the user will be offered the opportunity to add kernel options on the first page and to specify the devices/drives on the second screen. Use the TAB key to highlight OK and press ENTER to continue.
Add the desired kernel options (such as ‘noapic’), TAB to OK when finished, and press ENTER.
Select the drive(s) with the SPACEBAR. It is not recommended to select any partition. TAB to OK when finished and press ENTER.
GRUB Legacy Upgrades and Downgrades
For information on how to switch from GRUB Legacy to GRUB 2, or from GRUB 2 to GRUB Legacy, please refer to the Grub2/Upgrading community documentation.
Операционные системы Astra Linux
Оперативные обновления и методические указания
Операционные системы Astra Linux предназначены для применения в составе информационных (автоматизированных) систем в целях обработки и защиты 1) информации любой категории доступа 2) : общедоступной информации, а также информации, доступ к которой ограничен федеральными законами (информации ограниченного доступа).
1) от несанкционированного доступа;
2) в соответствии с Федеральным законом от 27.07.2006 № 149-ФЗ «Об информации, информационных технологиях и о защите информации» (статья 5, пункт 2).
Операционные системы Astra Linux Common Edition и Astra Linux Special Edition разработаны коллективом открытого акционерного общества «Научно-производственное объединение Русские базовые информационные технологии» и основаны на свободном программном обеспечении. С 17 декабря 2019 года правообладателем, разработчиком и производителем операционной системы специального назначения «Astra Linux Special Edition» является ООО «РусБИТех-Астра».
На web-сайтах https://astralinux.ru/ и https://wiki.astralinux.ru представлена подробная информация о разработанных операционных системах семейства Astra Linux, а также техническая документация для пользователей операционных систем и разработчиков программного обеспечения.
Мы будем признательны Вам за вопросы и предложения, которые позволят совершенствовать наши изделия в Ваших интересах и адаптировать их под решаемые Вами задачи!
Репозитория открытого доступа в сети Интернет для операционной системы Astra Linux Special Edition нет. Операционная система распространяется посредством DVD-дисков.
Информацию о сетевых репозиториях операционной системы Astra Linux Common Edition Вы можете получить в статье Подключение репозиториев с пакетами в ОС Astra Linux и установка пакетов.
В целях обеспечения соответствия сертифицированных операционных систем Astra Linux Special Edition требованиям, предъявляемым к безопасности информации, ООО «РусБИтех-Астра» осуществляет выпуск очередных и оперативных обновлений.
Очередные обновления (версии) предназначены для:
Оперативные обновления предназначены для оперативного устранения уязвимостей в экземплярах, находящихся в эксплуатации, и представляют собой бюллетень безопасности, который доступен в виде:
Ввиду совершенствования нормативно-правовых документов в области защиты информации и в целях обеспечения соответствия информационных актуальным требованиям безопасности информации, а также обеспечения их долговременной эксплуатации, в том числе работоспособности на современных средствах вычислительной техники, рекомендуется на регулярной основе планировать проведение мероприятий по применению очередных и оперативных обновлений операционной системы.

