Как установить clion на windows
Школа179
MinGW – вариант компилятора GNU C/C++ для Windows. Он используется всеми сторонними средами разработки, кроме Visual Studio, у которой собственный компилятор. Среда разработки, как правило, не связана тесно с компилятором MinGW и может использовать несколько разных версий MinGW. Компилятор MinGW может распространяться и вместе со средой разработки, как, например, Code::Blocks.
Но, в частности, среда CLion требует отдельной установки MinGW. Вы можете взять MinGW из Code::Blocks, он находится в каталоге MinGW внутри каталога, куда был установлен Code::Blocks, то есть полный путь к компилятору MinGW может быть таким: C:\Program Files (x86)\CodeBlocks\MinGW\. Или вы можете установить более новую версию компилятора отдельно – в Code::Blocks версия MinGW, как правило, довольно старая.
1. Инструкция по установке MinGW-w64
1. Скачать установщик mingw-w64-install.exe отсюда и запустить его.
Нажимаем next. Установщик скачивает информацию о доступных пакетах MinGW.
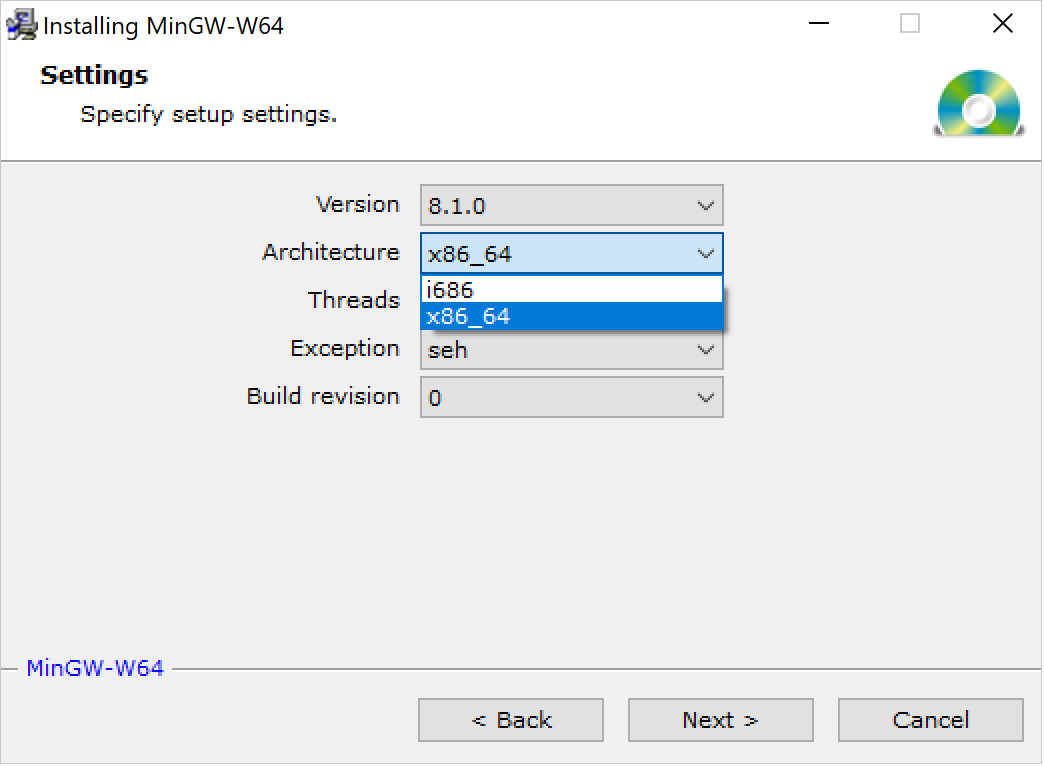
2. На следующей странице вы можете выбрать, какой вариант MinGW устанавливать: версия компилятора (последняя доступная будет 7.2.0 на начало 2018 г.), архитектуру (можно заменить 32-битную архитектуру i686 на 64-битную x86_64), другие параметры менять не следует.
3. В следующем окне задается путь для установки компилятора. Запомните этот путь или укажите другой.
4. Установщик скачивает нужные пакеты. Ждем завершения процесса.
5. Ждем появления сообщения «Click Next to continue the installation» и нажимаем Next.
6. Установка закончена.
После установки подкаталог bin каталога, куда был установлен MinGW, рекомендуется добавить в системную переменную PATH.
2. Установка и настройка Clion
Установка Clion никакой сложности не представляет. Жмём «Next» на всех экранах. Более сложна настройка CLion после запуска.
1. Здесь можно просто нажать OK. На других экранах, которые не упомянуты ниже, можно просто нажимать «Next».
file:clion1.png
2. Здесь нужно получить лицензию на использование Clion, для этого нужно ввести свой логин и пароль от кабинета на сайте jetbrains.com. Предварительно необходимо самостоятельно регистрироваться и получать лицензии на странице https://www.jetbrains.com/student/, при этом в качестве адреса электронной почты нужно указать адрес в домене @179.ru – тогда вы получите академическую лицензию на все продукты.
file:clion2.png
3. Здесь нужно добавить компилятор MinGW. Кликайте на ссылку MinGW.
file:clion2.png
4. На следующем экране нужно ввести выбрать путь к каталогу, куда установлен MinGW («Use MinGW home»). Дождитесь, пока clion определит версии компилятора и gdb.
file:clion4.png
5. На следующих экранах настраиваются дополнительные плагины, они вам не нужны, просто жмем Next.
3. Установка и настройка Code::Blocks
1. Рекомендуется скачивать Code::Blocks, содержащий компилятор MinGW, а потом исправить настройки MinGW. Ссылка для скачивания: https://sourceforge.net/projec[..]w-setup.exe/download
2. Установка Code::Blocks затруднений не представляет.
3. При первом запуске Code::Blocks обнаруживает Gnu GCC Compiler – скорее всего встроенный. Его нужно заменить на установленный MinGW. Нужно открыть меню «Settings – Compiler», На вкладке «Toolchain exacutables» Compiler’s installation directory заменить на каталог с MinGW (например, C:\soft\mingw-w64\i686-7.2.0-posix-dwarf-rt_v5-rev1\mingw32)
Install CLion
CLion is a cross-platform IDE that provides consistent experience on Windows, macOS, and Linux (for setup on FreeBSD, refer to this instruction).
System requirements
8 GB of total system RAM
Multi-core CPU. CLion supports multithreading for different operations and processes making it faster the more CPU cores it can use.
2.5 GB and another 1 GB for caches
SSD drive with at least 5 GB of free space
Officially released 64-bit versions of the following:
Microsoft Windows 8 or later
macOS 10.14 or later
Pre-release versions are not supported.
Latest 64-bit version of Windows, macOS, or Linux (for example, Debian, Ubuntu, or RHEL)
* CLion is not available for some Linux distributions, such as RHEL6/CentOS6, which do not include glibc version 2.14 required by JBR 11.
You do not need to install Java to run CLion because JetBrains Runtime is bundled with the IDE (based on JRE 11).
Toolchain requirements
When using bundled MinGW, no additional tools are required
In case of Cygwin, install the version 2.8 or later with the gcc-g++ and gdb packages
In case of using the MSVC compiler: Visual Studio 2013, 2015, 2017, 2019, or 2022
In case of using WSL: Windows 10 Fall Creators Update (least version 1709, build 16299.15) and the tools required in WSL (see the Linux tab)
Install using the Toolbox App
The JetBrains Toolbox App is the recommended tool to install JetBrains products. Use it to install and manage different products or several versions of the same product, including Early Access Program (EAP) and Nightly releases, update and roll back when necessary, and easily remove any tool. The Toolbox App maintains a list of all your projects to quickly open any project in the right IDE and version.
Install the Toolbox App
Run the installer and follow the wizard steps.
After you run the Toolbox App, click its icon in the notification area and select which product and version you want to install.
Log in to your JetBrains Account from the Toolbox App and it will automatically activate the available licenses for any IDE that you install.
Install the Toolbox App
There are separate disk images for Intel and Apple Silicon processors.
Mount the image and drag the JetBrains Toolbox app to the Applications folder.
After you run the Toolbox App, click its icon in the main menu and select which product and version you want to install.
Log in to your JetBrains Account from the Toolbox App and it will automatically activate the available licenses for any IDE that you install.
Install the Toolbox App
Extract the tarball to a directory that supports file execution.
For example, if the downloaded version is 1.17.7391, you can extract it to the recommended /opt directory using the following command:
Execute the jetbrains-toolbox binary from the extracted directory to run the Toolbox App and select which product and version you want to install. After you run the Toolbox App for the first time, it will automatically add the Toolbox App icon to the main menu.
Log in to your JetBrains Account from the Toolbox App and it will automatically activate the available licenses for any IDE that you install.
You can use this shell script that automatically downloads the tarball with the latest version of the Toolbox App, extracts it to the recommended /opt directory, and creates a symbolic link in the /usr/local/bin directory.
Standalone installation
You can install CLion manually and have the option to manage the location of every instance and all the configuration files. This is useful, for example, if you have a policy that requires specific install locations.
Run the installer and follow the wizard steps.
On the Installation Options step, you can configure the following:
Create a desktop shortcut for launching CLion.
Add the directory with CLion command-line launchers to the PATH environment variable to be able to run them from any working directory in the Command Prompt.
Add the Open Folder as Project action to the system context menu (when you right-click a folder).
Associate specific file extensions with CLion to open them with a double-click.
Extract the archive to the desired folder.
There are separate disk images for Intel and Apple Silicon processors.
Mount the image and drag the CLion app to the Applications folder.
Run the CLion app from the Applications directory, Launchpad, or Spotlight.
Unpack the downloaded CLion-*.tar.gz archive. The recommended extract directory is /opt :
Do not extract the tarball over an existing installation to avoid conflicts. Always extract to a clean directory.
Execute the CLion.sh from bin subdirectory to run CLion:
To create a desktop entry, do one of the following:
On the Welcome screen, click Configure | Create Desktop Entry
From the main menu, click Tools | Create Desktop Entry
When you run CLion for the first time, you can take several steps to complete the installation, customize your instance, and start working with the IDE.
Silent installation on Windows
Silent installation is performed without any user interface. It can be used by network administrators to install CLion on a number of machines and avoid interrupting other users.
To perform silent install, run the installer with the following switches:
/S : Enable silent install
/CONFIG : Specify the path to the silent configuration file
/D : Specify the path to the installation directory
This parameter must be the last in the command line and it should not contain any quotes even if the path contains blank spaces.
To check for issues during the installation process, add the /LOG switch with the log file path and name between the /S and /D parameters. The installer will generate the specified log file. For example:
Silent configuration file
You can download the default silent configuration file for CLion at https://download.jetbrains.com/cpp/silent.config
The default silent configuration file is unique for each JetBrains product. You can modify it to enable or disable various installation options as necessary.
Install as a snap package on Linux
You can install CLion as a self-contained snap package. Since snaps update automatically, your CLion installation will always be up to date.
To use snaps, install and run the snapd service as described in the installation guide.
On Ubuntu 16.04 LTS and later, this service is pre-installed.
CLion is distributed via two channels:
The stable channel includes only stable versions. To install the latest stable release of CLion, run the following command:
The edge channel includes EAP builds. To install the latest EAP build of CLion, run the following command:
When the snap is installed, you can launch it by running the clion.sh command.
Как установить clion на windows
Как начать делать лабы по АЯ. Windows (и не только).
Данный туториал написан для студентов МГТУ им Н. Э. Баумана и в частности для ИУ8 ради облегчения их нелёгкого пути по морям дискретной математики в лабораторных работах по Алгоритмическим языкам.
В последний раз прошу вас рассмотреть этот вариант и не идти дальше и посмотреть в сторону того же Ubuntu(годный дистрибутив для начинающих в линукс).
Как установить CLion и настроить Gtest
(То, что подчёркнуто красным нужно заполнить)
Установка стандартная, ничего дополнительно нажимать не требуется(только при желании это сделать)
Погдодовьте CLion к работе, настройте компилятор (Tutorial).
Далее нужно скачать Python
Установка стандартная, не требует дополнительных действий. Просто нажимаем далее, если спрашивают. Ничего не меняем
Установка стандартная, не требует дополнительных действий. Просто нажимаем далее, если спрашивают. Ничего не меняем
Заходим в папку с клонированным репозиторием в проводнике. Кликаем ПКМ и выбираем Git Bash Here
И выполняем эту команду.
Для Linux (Описано для Debian/Ubuntu и других систем, использующих apt)
Где взять ссылку показано на картинке
Ставим Github Desktop.
Если вы мало знакомы с командами гита, то эта программа с графическим интерфейсом поможет вам на первом семестре. Чтобы клонировать репозитории и хранить их локально на своей машине, вносить изменения на удалённый репозиторий и так далее.
Само собой логинимся через учётку github.
Изменить ветку на wp/lab
Начинаем работу c CLion и лабками.
Давайте разбёремся, как запускать тестики на вашей машине.
Вот наше окно в CLion с какой-то открытой лабой.
Если вы видите ошибку
значит у вас не установлены необходимые подмодули. Чтобы это исправить, скопируйте и вставьте эти команды в терминал / git bash находясь в корне локального репозитория
Немного пробежимся по среде разработки.
Слева мы наблюдаем всю файловую иерархию нашего проекта.
Снизу поле для вывода. Туда выводятся всевозможные ошибки CMake, а также там мы будем видеть, как проходят наши тестики.
Ну по центру место, где будем писать код, с подсветкой синтаксиса, автодополнениями и другим разработческим сахаром.
Итак, внимание в правый верхний угол. Если сборка вашего проекта прошла успешно (при условии что вы выполнили все пункты выше), то у вас будет похожая картина.
Для того, чтобы запустить тестирование, нажимаем на зелёный треугольничек, и смотрим в окно вывода:
и нажмите на зелёного жучка в той же верхней области (справа от стрелочки).
Видим, что мы вошли в режим дебаггера
Процесс дебаггинга легко остановить нажатием на красный квадратик в той же верхней правой строке.
Clang формат. Горячие клавиши.
В нашем ремесле существует специальная утилита clang-format. Она позволяет автоматически форматировать ваш код. К примеру рассмотрим код до и после применения этой утилиты:
Понятно, что такой код читать неприятно, а убирать все пробельчики и табуляции ручками неудобно.
Так что применим нашу утилиту и придадим коду удобоворимый вид:
Окно Clion: File->Settings->Keymap
Вводим в окно поиска «Reformat code» и смотрим
После этого вы сможете опробовать утилиту в действии!
Внесение изменений на удалённый репозиторий (сдача лабы)
Как только все баги пофикшены нужно, чтобы они отправились на удалённый репозиторий. (чтобы ваши изменения были видны не только вам :D)
Для этого входим в наш уже знакомый Github Desktop и видим, как он подхватил наши изменения:
Результат видим следующий: теперь всё ненужное идёт мимо, остались только наши изменения.
Осталось дать осмысленное описание нашему коммиту и отправить его в полёт на просторы github:

Далее переходим на страницу с лабой в браузере, переключаемся на ветку wp/lab :
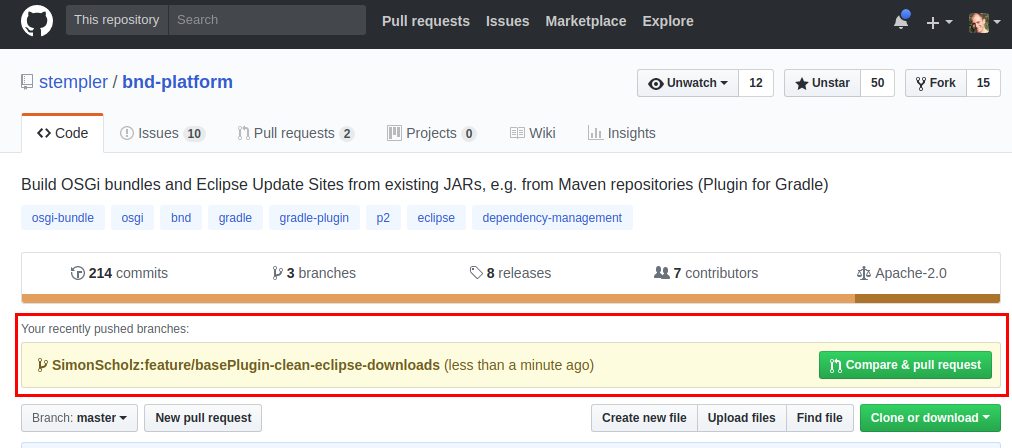
Тут у вас появится подобная рыжая вкладочка с предложением создания pull request’a
(что-то типо такого, картинку в интернетиках нашёл, не бейте)
Далее вашу лабу начнёт проверять система автоматизированной сборки и проверки тестиков.
Получив у него галочки по всем пунктам можно отсылать ссылку на pull request своему преподавателю. Дальше он будет вносить свои коррективы в ваш код.
Я попытался написать поподробнее не только про саму работу на Шиндоус, но и общему подходу к лабкам в принципе. Не сильно беспокойтесь, что сейчас всё это кажется таким сложным и муторным. Парочка итераций по алгоритму и вы сами просечёте, в чём фишка и будете делать это всё на автомате.
Если что, обращайтесь к вашим менторам/волонтёрам/преподавателям. Вам обязательно помогут. За сим откланиваюсь. Спасибо за внимание.
Copyright 2020 aaaaaaaalesha & rkulagin
About
Данный туториал написан для студентов МГТУ им Н. Э. Баумана и в частности для ИУ8 ради облегчения их нелёгкого пути в лабораторных работах по Алгоритмическим языкам.
Tutorial: Configure CLion on Windows
On Windows, CLion toolchains include the make utility, C and C++ compilers, debugger executables and the environment. You can select one of the pre-defined toolchain setups (MinGW, Cygwin, Microsoft Visual C++, or WSL), Remote Host, Docker) or configure a custom toolchain (System):
If you don’t need to configure custom tools or don’t want to install additional software on your system, stick to MinGW (default) as it works out-of-the-box using the MinGW toolset bundled in CLion.
For details on Remote Host toolchains, see Full Remote Mode. If you are working with a Docker container, see Docker toolchain.
MinGW
Install MinGW (optional)
Download and run the MinGW-w64 installer. It provides both 64- and 32-bit options.
In the MinGW-w64 installation wizard, make sure to select the required architecture. Note that the default suggested option is 32-bit.
Wait for installation to finish.
Although MinGW-w64 provides both 64- and 32-bit options, you can also install MinGW, the 32-bit-only version.
Wait for installation to finish.
Configure a MinGW toolchain
Wait until the tools detection finishes.
Select the Debugger : you can use either bundled GDB, your MinGW GDB, or a custom GDB binary.
The recommended option is bundled GDB, since it is guaranteed to include Python support required for CLion data renderers.
Click Apply when all the tools are set correctly.
Cygwin
Download the Cygwin installer, version 2.8 or later.
Run the installer and select the following packages:
To select a package, type its name in the Search field and set the version in the New column:
CLion will attempt to detect the Cygwin installation automatically. Check the Toolset field, and specify the path manually if required.
Windows Subsystem for Linux
You can use WSL, Windows Subsystem for Linux, as your working environment in CLion on Windows 10 (starting the Fall Creators Update version 1709, build 16299.15).
WSL toolchain enables you to build projects using CMake and compilers from Linux and run/debug on WSL without leaving CLion running on your Windows machine.
Refer to our WSL guide for details on setting up WSL on your system and configuring WSL toolchains in CLion.
Microsoft Visual C++
Install Visual Studio 2013, 2015, 2017, 2019, or 2022 on your system.
Check the Toolset field. CLion will attempt to automatically detect the installed Visual Studio distribution. If the detection fails, set the path to Visual Studio manually.
Wait until the tools detection is finished
MSVC compiler
CLion supports the Microsoft Visual C++ compiler that ships with Visual Studio 2013, 2015, 2017, and 2019.
Note that msbuild is not supported: CLion runs CMake with the NMAKE generator instead.
For the case when your code includes MSVC extensions, CLion provides the support for:
additional format specifiers, such as %I32 and %I64 ;
Clang-cl compiler
Install clang-cl from the LLVM site or along with the Visual Studio tools.
When installed from the LLVM site, the clang-cl binary can be found at the standard location C:\Program Files\LLVM\bin\clang-cl.exe for the 64-bit version or C:\Program Files (x86)\LLVM\bin\clang-cl.exe for the 32-bit version.
In CLion, go to File | Settings | Build, Execution, Deployment | Toolchains and select the Visual Studio toolchain that you want to configure, or create a new one.
MSVC debugger
The MSVC toolchain debugger is implemented on top of LLDB, and it can work with native visualizers from the Visual Studio installation or from your project.
To enable native visualizers support and set the desired diagnostics level, select the Enable NatVis renderers for LLDB checkbox in Settings | Build, Execution, Deployment | Debugger | Data Views | C/C++ :
If you have custom native visualizers in your project, CLion will use them as well.
System toolchain
Configure the tools and provide an environment script if required:
Initializing the toolchain environment via a script
Specifying an environment script is available for all toolchains. However, it is not supported for CMake presets at the moment (CPP-26576).
Environment sourcing will happen on the first actual usage of the toolchain in a CMake profile or upon loading a Makefile project.
In the Environment file field, specify the path to the script:
You will get notifications in case of script loading issues. CLion also checks the script loading time and terminates the execution if it takes too long.
Clang compiler on Windows
With CMake 3.15, it has become possible to use the Clang compiler on Windows with the MinGW-w64/MinGW toolchain.
However, the LLVM Clang for Windows is built using Microsoft Visual Studio, and all the built-in macros and include search paths are set up for use with Visual Studio. So if you take Clang from the LLVM repository, it will not work correctly when configured with the MinGW toolchain. One of the possible workarounds is described below.
Set up the Clang compiler for MinGW
This way, you will get the Clang compiler which is built with mingw-w64 and has paths and macros that correspond to this toolchain.
With this new toolchain configured, you can build the project and start using the Clang’s advances tools, such as profile-guided optimization. Take a look at our detailed blogpost for instructions.
GDB on Windows
In the case of MinGW, CLion includes the bundled GDB (version 10.2). For Cygwin, you need to install the GDB package in the Cygwin Package Manager, as described in the Cygwin section of this guide.
You can also switch to a custom GDB binary. In this case, the supported GDB versions are 7.8.x-11.1.


